

Yoga not only physically strengthens the body, it also helps you to master your emotions, connect to yourself and to your environment on a spiritual level and also transitions you from feeling tired to energized, tense to soft and so forth and so on.
When the majority of us think of yoga, we imagine a bendy 30-something touching their ear with their right big toe and moving in directions we’ve only seen at the circus.
Which is exactly where we go wrong.
Yes, if you have a body, which most of us do, you can practice yoga. By buying into stereotypes, we do ourselves a disservice, and if it means we believe we can’t delve into the practice personally, then it’s something that needs to be altered and quicksmart.
Yoga is incredibly beneficial and can be an important tool in creating balance and calmness, particularly in this day and age of high stimulation, expectation and pressure.
We all experience those busy, stressful days where it seems near impossible to carve out the time and space needed to exercise, wind down with a hot bath or book in a massage.
So we wanted to create 5 fail safe yoga poses that are achievable for all levels, and postures so easy to execute and that will allow you to STOP. DROP and YOGA wherever you find yourself.
Each of these 5 postures below are the most effective for when you want (or need) to release some tension and move into a state of calmness, and in as little as 10 minutes you will also be able to re-energize yourself and shift back into your vibrant, self.
YOGA IS FOR EVERY BODY
*****Remember to listen to your body, and if something doesn’t quite ‘feel right’, then breathe your way back into a seated posture and rest.
1
CHILDS POSE
Traditional sanskrit name : Bālāsana
Child's Pose is a gentle stretch and can help relieve stress and tension in the spine, back, hips, thighs, and ankles. Use this pose wisely, listen to your body's inner voice, and adjust and position yourself to honour the signals it communicates with you.
How to execute the pose
Step One
Kneel on the floor and separate your knees about as wide as your hips or the edge of your mat. Touch your big toes together and sit gently on top your heels.
Step Two
On the exhale, lower your torso down between your thighs. Broaden your lower back, become heavy in the tailbone and allow your hips to sink down onto the inner thighs. Press your forehead lightly to the mat and lengthen the back of your neck.
Step Three
Lay your hands on the floor alongside your torso, palms up, and release the fronts of your shoulders toward the floor. Feel how the weight of the front shoulders pulls the shoulder blades wide across your back.
Step Four
Balasana is a resting posture. You are encouraged to breathe deeply and feel the pose for up to a few minutes. To come up, first lengthen the front torso, and then with an inhalation lift from the tailbone as it presses down and into the pelvis.
2
BUTTERFLY POSE
Traditional sanskrit name : Baddha Konasana
This beautiful pose helps to open up the hips and groin. Adults often lose flexibility as they age, and stretching the hips and inner thighs in Baddha Konasana can begin to counteract the effects of spending too much time sitting in a chair or in a car. It will also help prepare you for other meditative seated poses, which require good flexibility in these areas.
How to execute the pose
Step One
Sit with your legs straight out in front of you, raising your pelvis on a blanket if your hips or groin are tight. Exhale, bend your knees, pull your heels toward your pelvis, then drop your knees out to the sides and press the soles of your feet together.
Step Two
Bring your heels as close to your pelvis as you comfortably can. With the first and second finger and thumb, grasp the big toe of each foot. Always keep the outer edges of the feet firmly on the floor. If it isn't possible to hold the toes, clasp each hand around the same-side ankle or shin.
Step Three
Never force your knees down. Instead release the heads of the thigh bones toward the floor. When this action leads, the knees follow.
Step Four
Stay in this pose anywhere from 1 to 5 minutes. Then inhale, lift your knees away from the floor, and extend the legs back to their original position.

Amelia taking a moment to breathe deeply in between each pose. You can flow from one position to another or take a moment between each movement. Amelia is wearing our sustainably produced Full length leggings and our basic singlet all made from natural beechwood.
3
SUPPORTED BRIDGE POSE
Traditional sanskrit name : Setu Bandha Sarvangasana
This suppresses the sympathetic "fight-or-flight" nervous system and promotes the parasympathetic nervous system. Back extensions also help relieve the hunch from poor posture and sitting, giving you more flexibility and mobility for daily activities. This pose also helps open the chest for better breathing and if you have chronic lower back pain, it may offer relief.
How to execute the pose
Step One
Lay on your back with your legs straight out in front. Bend your knees and bring the souls of your feet hip width distance apart. Extend your arms on the floor with your fingers reaching toward your heels. You should be able to just touch the backs of your heels with your fingertips.
Step Two
Take hold of your block, or a pillow, lift your pelvis skyward, keep your thighs and inner feet parallel and bring your support underneath the sacrum. Balance yourself comfortably on top. Make sure you feel stable and supported.
Step Three
Keep your knees inline with your ankles and allow your shoulders, neck and head to relax. This is once again a deeply restorative posture. It allows the spine to experience extension while being gently supported. Take 10 breaths, make your way gently out of the posture and endeavour to practice three rounds in total.
4
PIGEON POSE
Traditional sanskrit name : Eka Pada Rajakapotasana
Pigeon Pose specifically works as a hip opener and forward bend, stretching your thighs, groin, back, piriformis, and psoas. The leg extended to the rear gets a stretch of the psoas and other hip flexors. On the other side, the rotators and outer hip are stretched. A wonderful antidote to sitting for long periods.
How to execute the pose
Step One
Come onto all fours with your hands shoulder-distance apart and about a step in front of your shoulders. Bend your left knee forward and place it on the floor just behind and slightly to the left of your left wrist, with your knee at an angle that creates a stretch in the hip without pain in the knee. Walk your left knee behind you until your leg is fully extended. Draw your inner thighs energetically toward each other, which will slightly lift your pelvis.
Step Two
You want to have your hip bones square toward the front of the mat. As you roll your right hip bone forward, draw your left outer hip back and in toward the midline of your body. Find the middle point where equal weight is between your left and right sides, and your pelvis is squared to the front of your mat. Untuck your right toes and find a long straight line from your right hip to your toes.
**If the right hip is off the ground, use a folded blanket, foam block, or bolster under your right hip for support, keeping the hips square and level.
Step Three
Once you feel aligned and supported, Option to straighten your arms and bring your hands to the floor in front of you. Find rhythm with your breath and as you exhale you can begin to walk your hands forward, bringing your forearms on to the floor and moving deeper and deeper. Make sure you aren’t holding tension in the shoulders, neck or knees. Breathe 5 deep breaths and gently walk your hands back up towards your body, coming out of the posture. Option to do one more round.
5
CORPSE POSE
Traditional sanskrit name : Savasana
This pose, although it looks incredibly easy, has often been called the most difficult of all the postures. Indeed, many yoga students who can happily balance, bend, and twist through the rest of class struggle with just lying on the floor. To relax, in silence, and meditate, is certainly harder than it looks.
How to execute the pose
Step One
Rest your entire body on the floor. Extend your arms and legs outward from the torso evenly and symmetrically. Separate your feet, relaxing your toes out to the sides and place the palms of your hands on the floor looking skyward. Make sure your shoulder blades are close and open through your chest.
Step Two
Mentally scan the body from head to feet, gradually releasing each body part and each muscle group; take time to notice all the places where the body is making contact with the floor. With each exhalation, imagine each limb getting a little heavier and spreading out a little more.
Step Three
Soften the tongue, relax your face and forehead, the bridge of the nose between the eyebrows. Let the eyes sink to the back of the head, and allow your whole self to soften, gazing inward.

Amelia soaking up the natural rays in her sustainable leggings. These are our ¾ leggings and our Taylor turtle neck all made in sustainable beechwood.
You can finish off this short but feel-good introduction to Yoga with a 5 minute meditation session.
All these poses can help nurture mind and body and spirit. You can help nurture the experience and nurture the body by wearing soft, natural, sustainable clothing. Find pieces that are gentle on the body. Sustainable and eco friendly clothing can add to the feeling of tuning in to your environment, tuning in to the world and tuning in to your body.


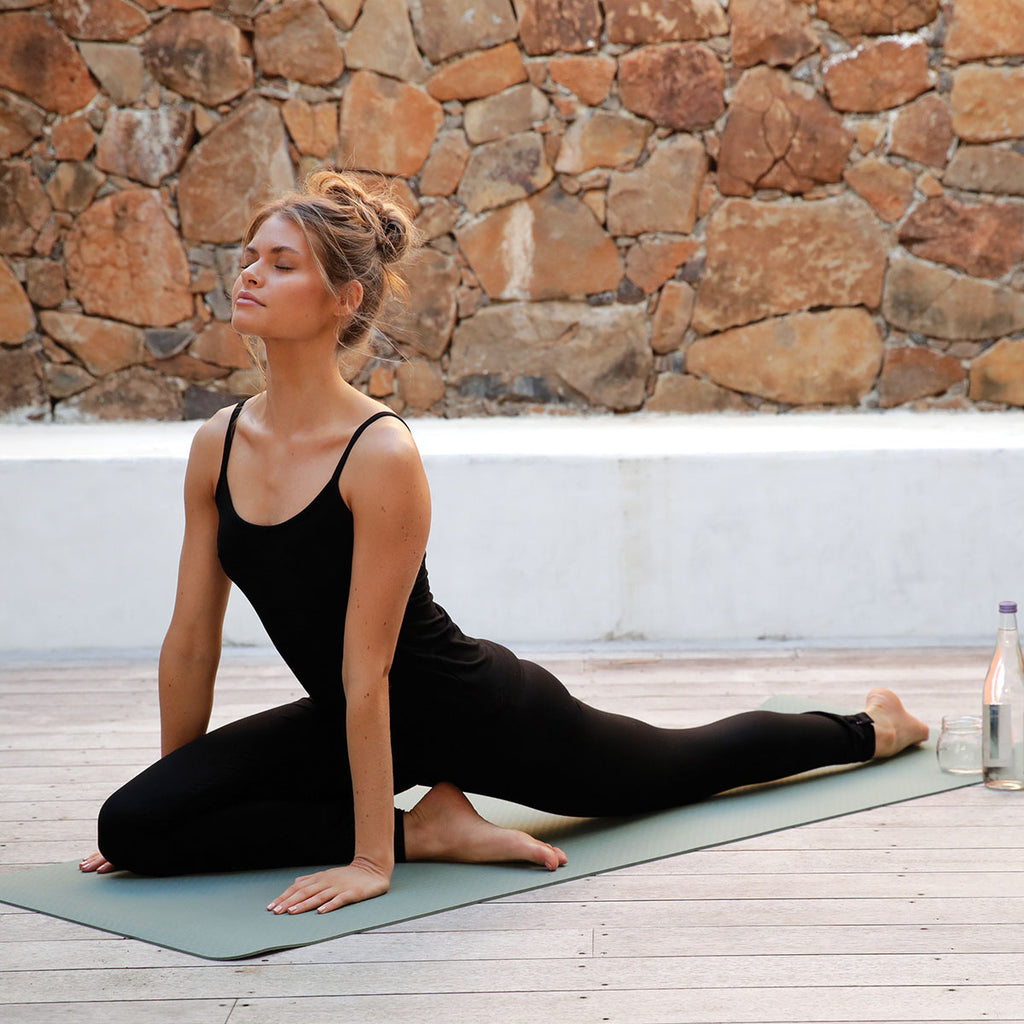
Courtney enjoying Yoga in beautiful Barcelona.
0 comments